How to Install a Live Streaming Wildlife Camera
Introduction + Background
This is how it began
 First, this guide was intended to provide initial guidance to those interested in installing a camera on a raptor nest. We often get many emails inquiring about this topic, as we have hosted several wildlife cameras in the past, and hope this resource will help guide you in the right direction. With all of the advances in technology and internet access, live streaming cameras are a great option for educating the public about a species or public resource.
In this guide, which was written by a biologist, not an IT expert is meant to help you decide if this project is worth your time and effort. Through out it, you will see references to making connections or partnerships with experts in the field, as building any network camera system will take expertise in its design, connection and long term maintenance.
NOTE: We are working with a security camera business to develop this guide for designing and installing these wildlife focused camera systems.
Our experience with network cameras began in 2013 with the Forsythe Osprey Cam, which was a stand alone remote system that was installed on the coastal saltmarsh. It was powered by batteries (DC), which were maintained by solar panels. In 2014, we partnered with NJDEP Fish & Wildlife to update the Jersey City Falcon Cam, the oldest wildlife focused live streaming camera in NJ (installed in 2001). It went offline in 2020, after the pair of falcons abandoned the nest site.
In 2019, we established the Barnegat Light Osprey Cam and have installed/partnered on several other nest cameras, including the Mercer Oaks Eagle Cam, Three Bridges Eagle Cam, and continue to partner with other organizations/agencies on the Union County Falcon Cam, Duke Farms Eagle Cam, Pete McLain Osprey Cam, LBIF Marsh Cam, Forsythe Osprey Cam. The establishment of the Barnegat Light Osprey Cam had a goal of raising awareness for ospreys within the Barnegat Bay watershed and had direct ties to our osprey banding and re-sighting project — Project RedBand.
Project Planning
The most important part
This area is still under development, but the most important considerations are your goals. Why install a camera on a bird nest? Do you have access to the internet or AC power? Who owns the land or structure where you intend to install your camera? Is the species endangered or are other important considerations needed with regards to access to the site, permits to access land or work in close proximity to a rare species? How will any timing restrictions affect maintenance to the camera, which is eventually needed at some point. Lastly, what is your budget and available resources for managing a network security camera?
These are all very important considerations that affect the feasibility of installing a camera at a bird nest or other outdoor site.
Another key factor to consider is public engagement and interaction. Is the camera focused on one point? Will it be actively moved or adjusted to capture specific features or activity to engage viewers? Leaving a camera with a static view does not draw as much of a following. We know from our experience with the Barnegat Light Osprey Cam, where we have engaged with several volunteers over the years who have devoted much time to controlling the camera and engaging with viewers in chat.
Content moderation is another factor, that is, if you plan to have any kind of live chat. Also, having a solid policy on dealing with any issues that might arise are always key, like what you do when a bird becomes entangled or a bird dies of starvation. How do you respond to these issues that cause much emotion in humans who are watching live? Partnerships are key to address some of these issues and having plans in place to take quick action, if needed.
Equipment
What you will need
Here is a breakdown of basic equipment needed.
- Network Camera – (we have experience with Axis Communications)
- Infrared Light – Axis or Raytec (some cameras have them built in, which is very nice).
- Microphone – ETS (some new Axis cameras better support audio with midspans that have auxiliary inputs)
- Midspan or POE adapter or POE switch – this powers the camera and is often included but there are others that can also support audio
- Outdoor rated Cat6 wire – essential
- Router/modem
- Camera mount
Hardwired vs. Remote (Internet + Power)
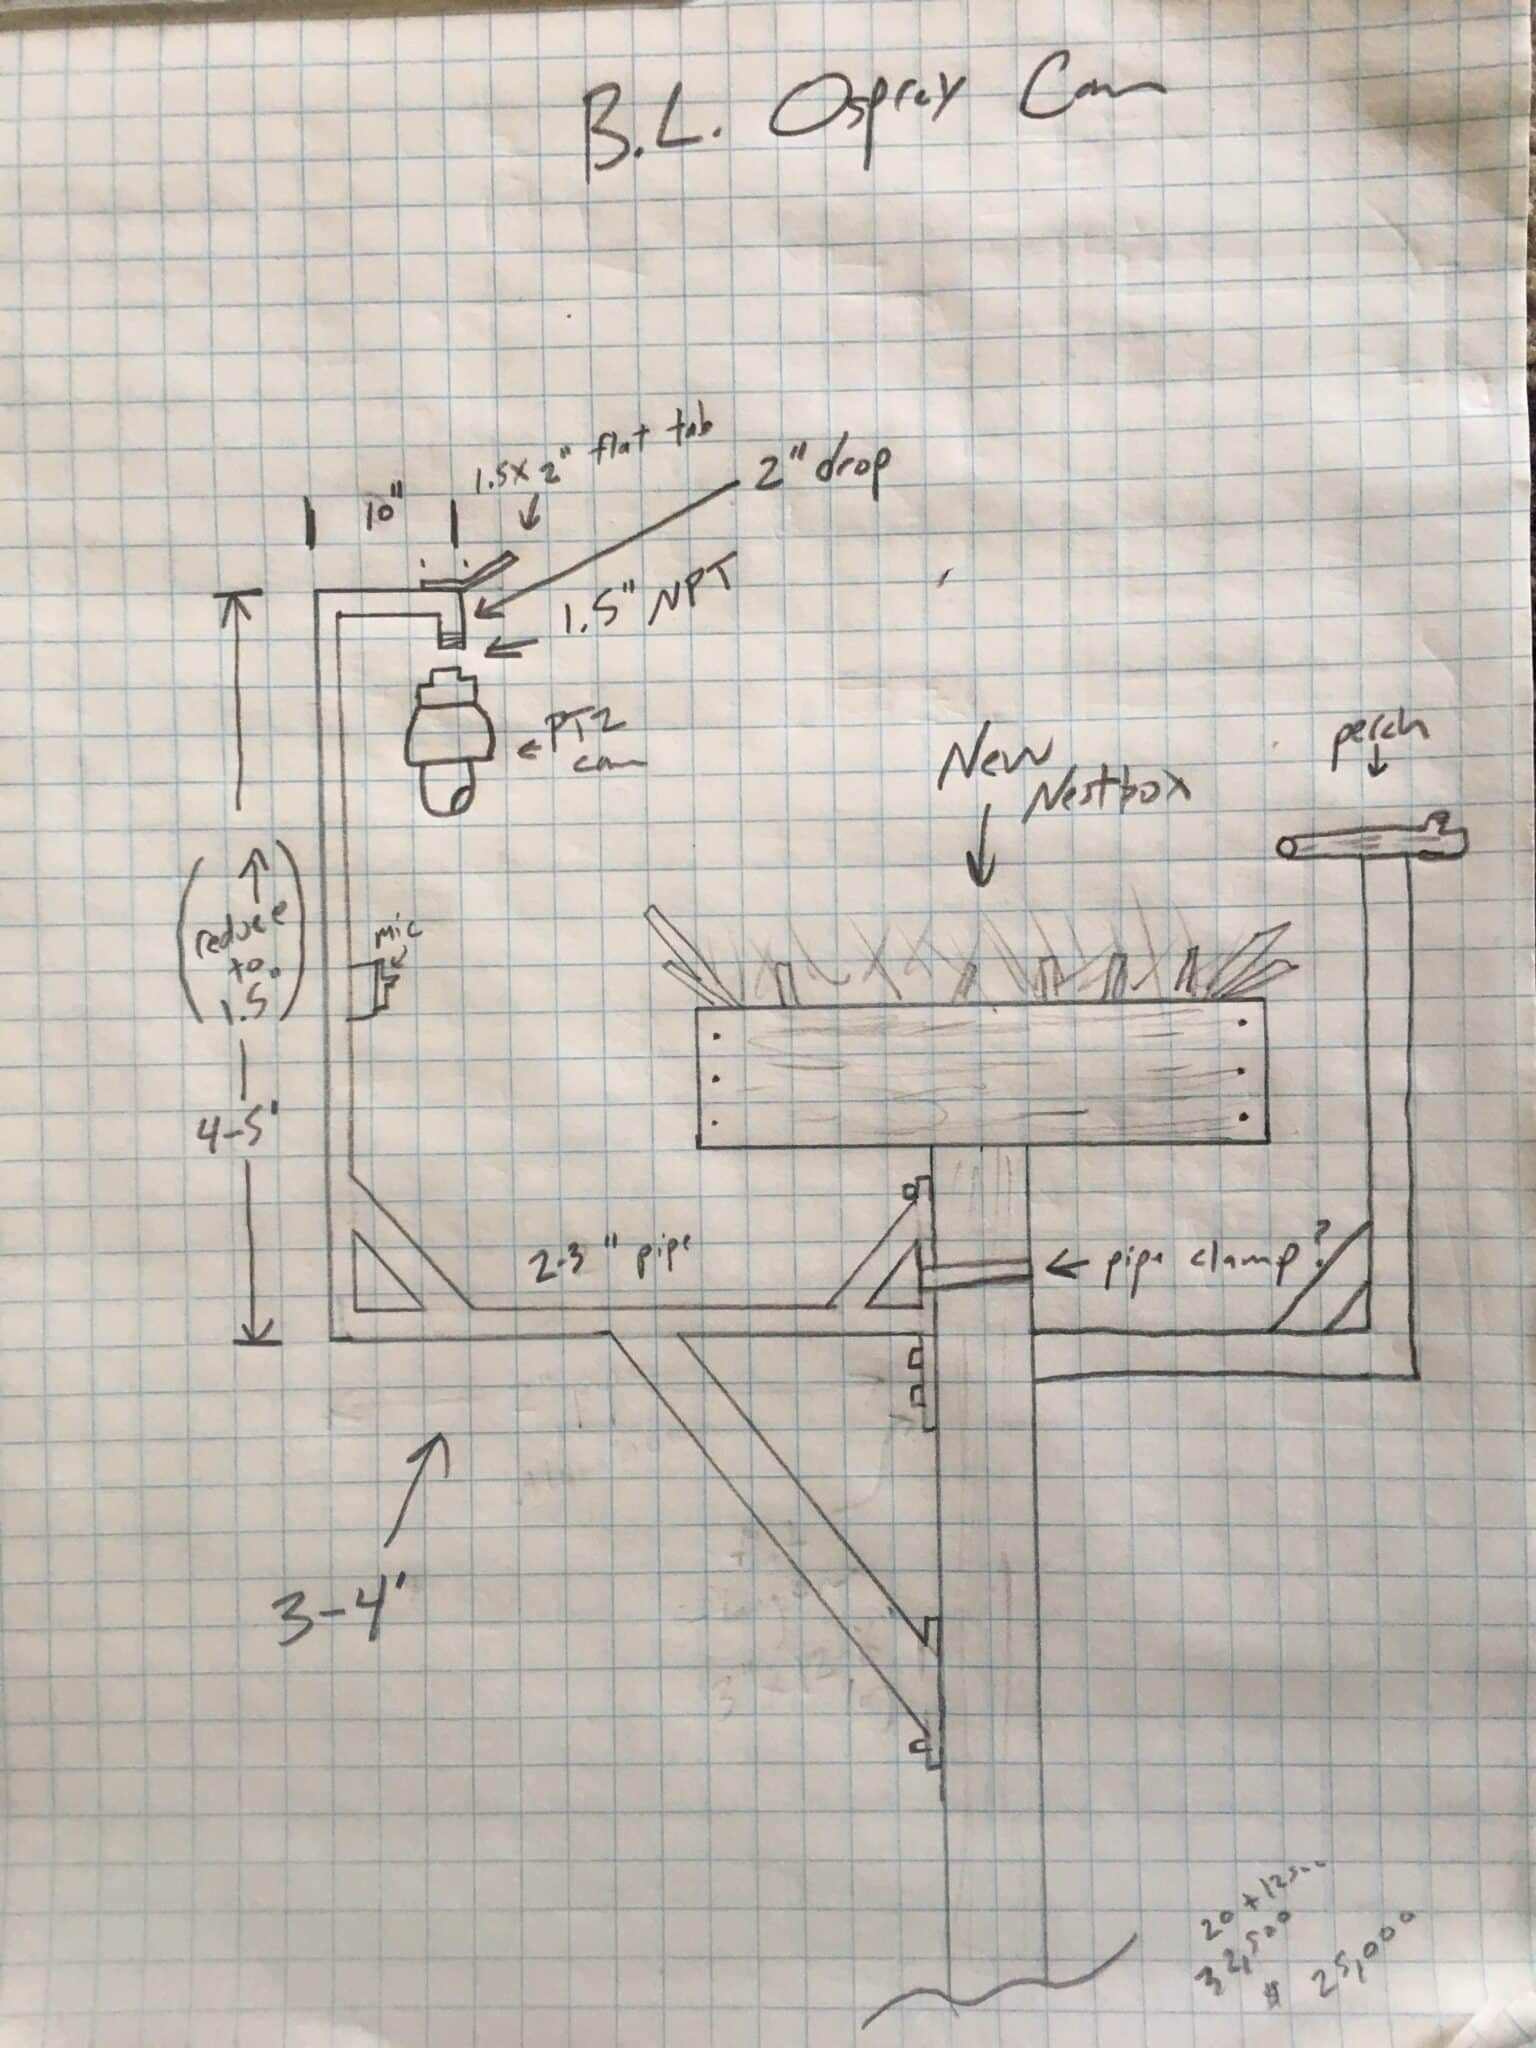
For our osprey cam we use an Axis Communications PTZ network camera. The camera needs an arm/pole mount, which Axis also sells. There are some with weatherproof wiring for the cam, which are helpful during install. We used a custom aluminum bracket to mount the camera to the nest platform. We will share some more feedback with regards to this design after recently replacing the wiring inside the pole mount.
Our camera is hardwired (connected to AC power source) but can also be run on DC using solar charged batteries if needed for a remote install (more on this below). A power over ethernet adapter is used to power the camera and transmit data. We had an external microphone installed at nest level. This was removed and will be replaced at a lower level (to reduce wind noise) and be a model by Axis Communications.
Infrared light is needed as well and can run off of POE network cable or low voltage wiring, if you want to see at night. We used one from Raytech. Some camera now have IR built into them, like the Axis Q6358-LE.
Camera Location:
An important design consideration is where to mount the camera. Our first camera that was installed in 2013 and powered by solar charged batteries was mounted on a separate pole for the camera and solar array. It worked well but needed a lot of maintenance with battery replacement, solar charge controller, DC switch all needing to be replaced at some point.
We opted to move our camera and install one on an actual nest platform. The camera in Barnegat Light was installed on a custom made aluminum bracket we had fabricated. That held the camera, IR light and microphone. It is approximately 3′ from the nest, which is the minimum focus distance of the camera (another very important design consideration if you want your subject to be in focus). You also don’t want it to be too close as PTZ cameras do make some noise when they pan. We also wanted our new camera to be on land, with AC power and dedicated internet.
We use Camstreamer to broadcast the live stream to YouTube. You buy is a license (there is a 30 day trial you can run at first) and the software is run by the network camera, so there is no other equipment needed. You can also choose to stream to Facebook, Vimeo or a few other networks.
Finally, installing the camera where it can get AC power and be hardwired to a land based internet service provider is definitely the most resilient and cost effective way to go. Solar powered setups will cost over $10k with panels, batteries and associated equipment, while AC powered setups only need the additional wiring, which should cost no more than $5k (depending on camera model and install costs are not included). Also, if connecting to a wireless network, streaming costs will be extremely expensive. At one camera that we partnered on with a utility company, their 4G internet data plan was around $2k a month (this camera is now offline due to inactivity and high costs).