How to Install a Live Streaming Wildlife Camera
 Introduction + Background
This guide was developed to provide initial guidance for those interested in installing a camera at a raptor nest. We frequently receive inquiries about this topic because of our experience hosting several wildlife cameras, and we hope this resource helps point you in the right direction.
With advances in camera technology and internet connectivity, live-streaming wildlife cameras have become an excellent tool for educating the public about wildlife species and natural resources.
This guide was written by a biologist, not an IT professional. Its purpose is to help you determine whether a wildlife camera project is worth your time, effort, and investment. Throughout the guide, you will find references to building partnerships with experts in the field, as designing, installing, and maintaining a network camera system requires specialized knowledge and long-term commitment.
Note: We are currently working with a security camera company to further develop this guide and provide additional technical guidance for designing and installing wildlife-focused camera systems.
Our experience with network cameras began in 2013 with the Forsythe Osprey Cam, a standalone remote system installed in a coastal salt marsh. The camera was powered by batteries that were maintained by solar panels.
In 2014, we partnered with NJDEP Fish & Wildlife to upgrade the Jersey City Falcon Cam, the oldest wildlife-focused live-streaming camera in New Jersey. Originally installed in 2001, the camera remained active until 2020, when the resident falcon pair abandoned the nest site.
In 2019, we established the Barnegat Light Osprey Cam and have since installed or partnered on several other nest cameras, including the Mercer Oaks Eagle Cam and Three Bridges Eagle Cam. We also continue to partner with organizations and agencies on the Union County Falcon Cam, Duke Farms Eagle Cam, Pete McLain Osprey Cam, LBIF Marsh Cam, and Forsythe Osprey Cam.
The Barnegat Light Osprey Cam was established to raise awareness about ospreys within the Barnegat Bay watershed and serves as an important component of our osprey banding and resighting initiative, Project RedBand.
Project Planning
The Most Important Part
This section is still under development, but the most important consideration is defining your goals.
Why do you want to install a camera on a bird nest? Do you have access to internet service and electrical power? Who owns the land or structure where the camera will be installed? Is the species endangered, or are there other considerations regarding site access, permits, or work near sensitive wildlife?
You should also consider how seasonal restrictions may affect future maintenance, which will inevitably be required. Finally, evaluate your budget and available resources for operating and maintaining a network camera system.
These factors will determine the overall feasibility of installing a camera at a bird nest or other outdoor location.
Public engagement is another key consideration. Will the camera remain fixed on a single view, or will it be actively controlled to capture different perspectives and wildlife activity? Static camera views generally attract fewer viewers over time.
Our experience with the Barnegat Light Osprey Cam has shown that active camera operation and viewer engagement can significantly increase interest. Several dedicated volunteers have spent countless hours controlling the camera and interacting with viewers through live chat.
Content moderation should also be considered if you plan to host a live chat. Equally important is developing a policy for responding to sensitive situations, such as nest entanglements, injuries, or nest failures. Wildlife cameras can evoke strong emotions in viewers, and having clear procedures and trusted partners in place will help you respond appropriately when issues arise.
Equipment
What You Will Need
Below is a list of basic equipment commonly used in wildlife camera systems:
- Network camera (we have experience with Axis Communications cameras)
- Infrared (IR) light (Axis or Raytec)
- Microphone (ETS, Axis) – outdoor rated
- Midspan, PoE adapter, or PoE switch
- Outdoor-rated Cat6 cable rated for direct burial or aerial installation
- Router/modem
- Camera mount
Hardwired vs. Remote Systems (Internet + Power)
For our osprey cameras, we use Axis Communications PTZ (pan-tilt-zoom) network cameras. These cameras require a suitable mounting arm or pole mount, which Axis also manufactures. Some models include weatherproof cable management systems that simplify installation.
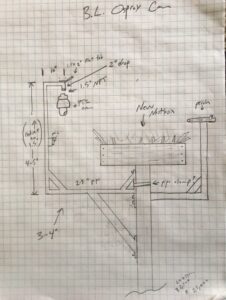
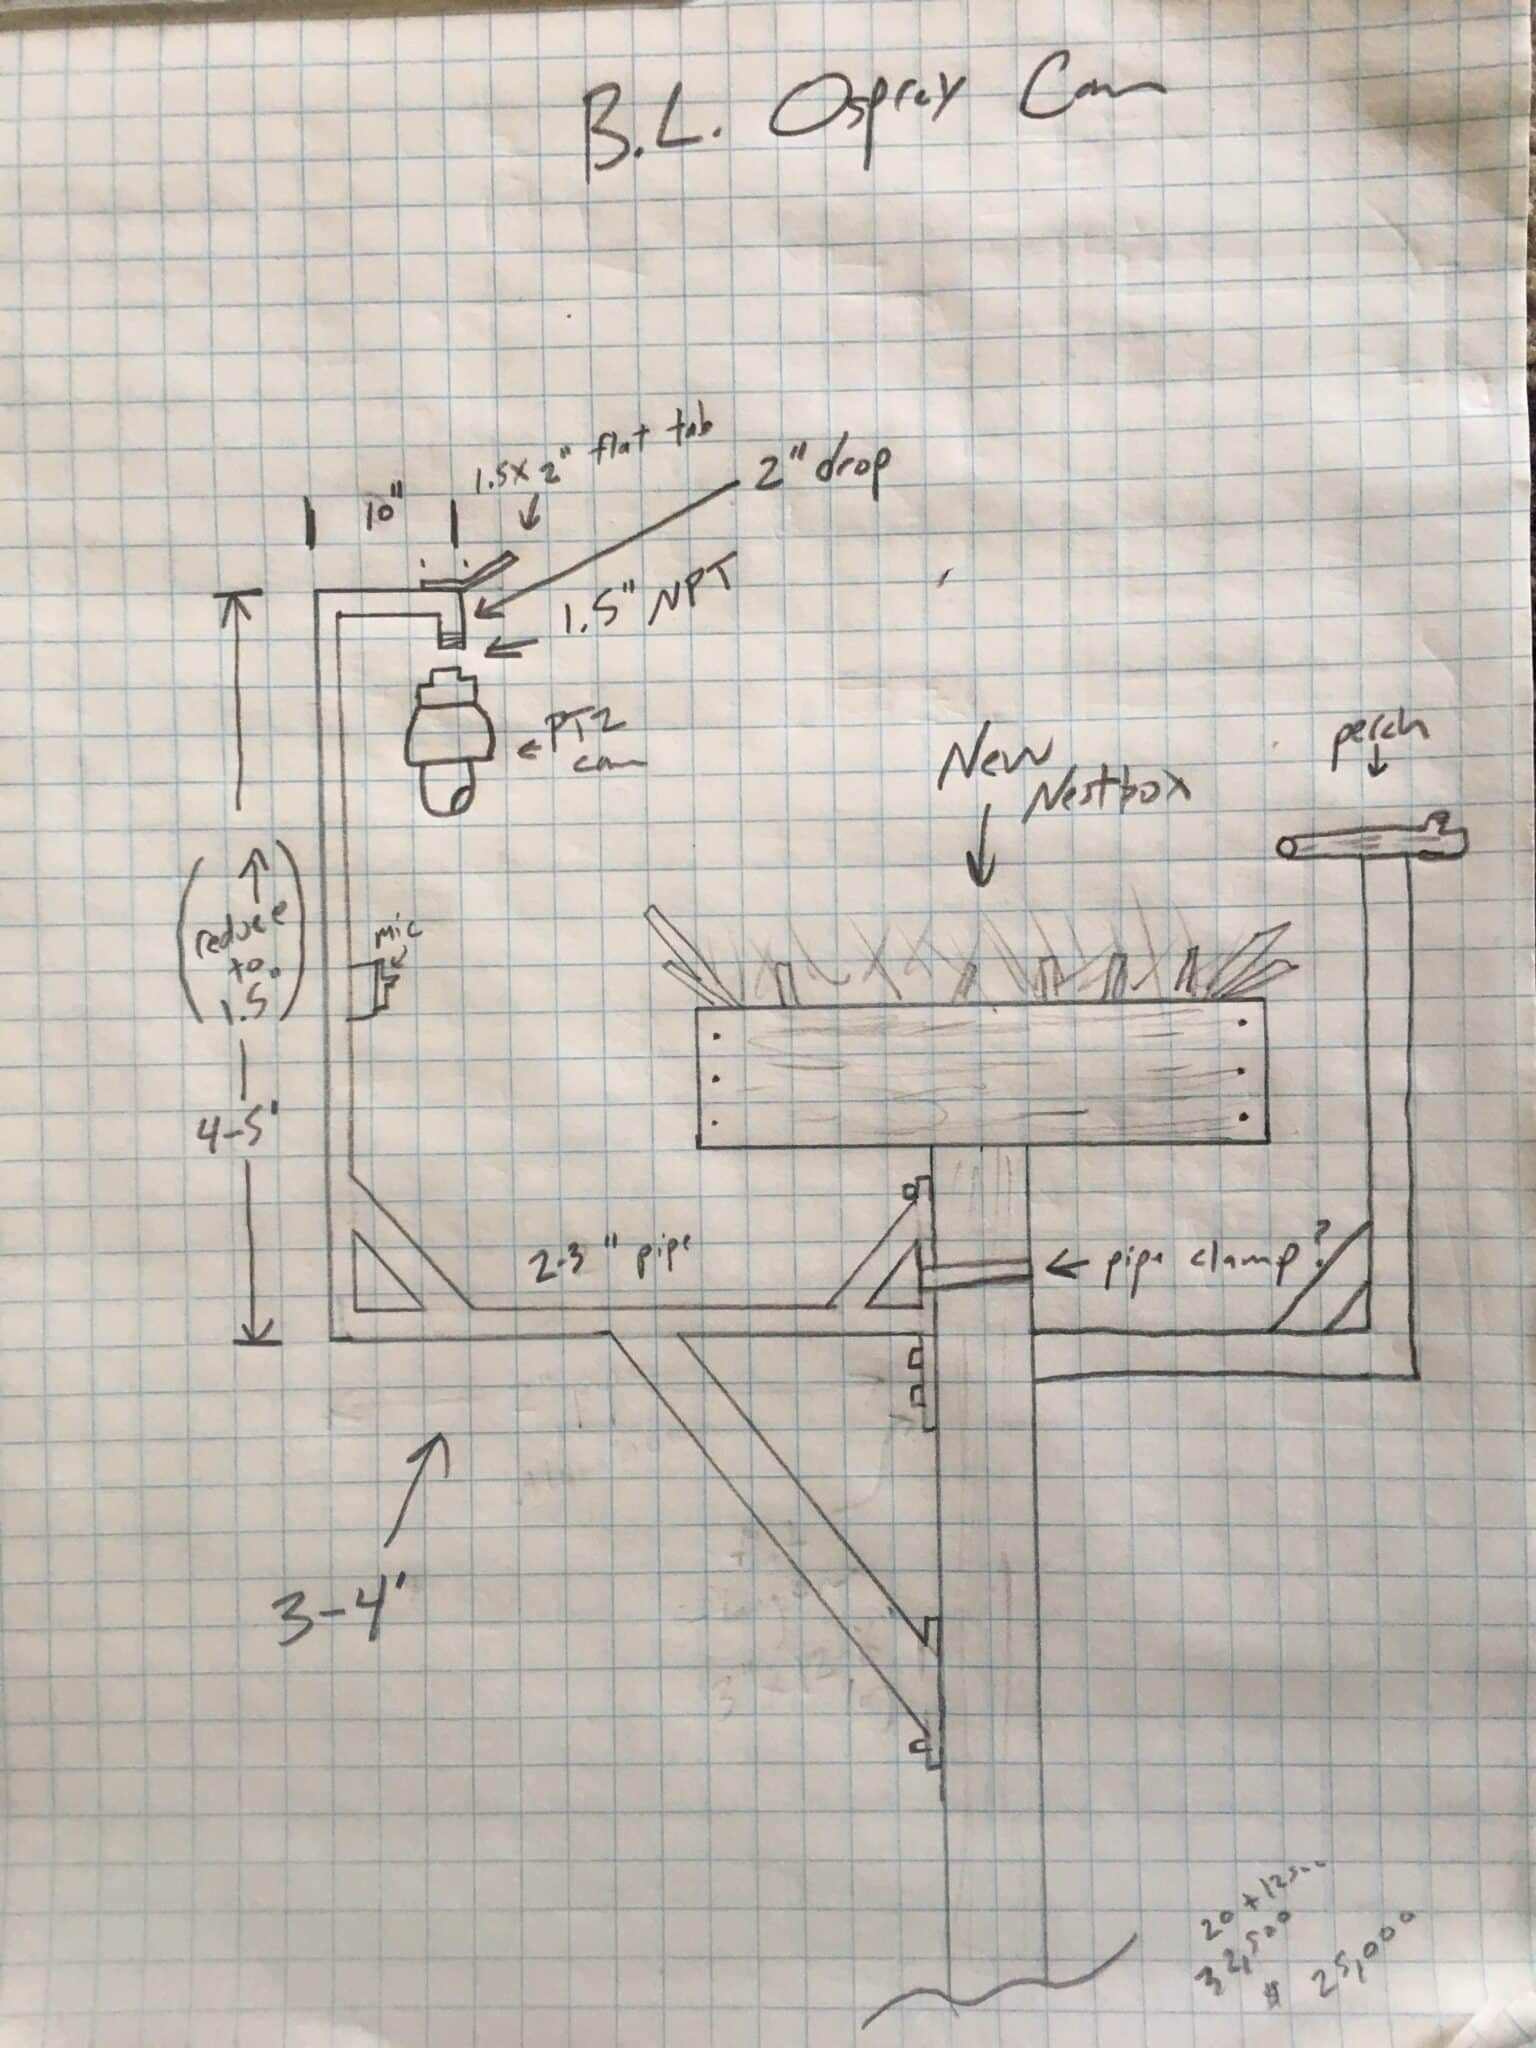
For the Barnegat Light Osprey Cam, we used a custom-fabricated aluminum bracket mounted directly to the nest platform. We recently replaced the wiring within the mount and will provide additional design feedback in future updates, which will likely suggest using a larger diameter pipe.
Our current camera is hardwired to an AC power source, although similar systems can also operate on DC power supplied by solar-charged batteries for remote installations.
Power-over-Ethernet (PoE) technology allows a single cable to provide both electrical power and data transmission. We also installed an external microphone near the nest. That microphone has since been removed and will be replaced with an Axis model installed at a lower elevation to reduce wind noise.
Infrared lighting is necessary if nighttime viewing is desired. IR lights can operate using PoE or low-voltage wiring. We previously used a Raytec infrared illuminator, although some newer cameras, such as the Axis Q6358-LE, have built-in infrared capability.
Camera Location
Camera placement is one of the most important design considerations.
Our original camera, installed in 2013, was mounted on a separate pole that also supported the solar array. While the system functioned well, it required substantial maintenance over time. Batteries, charge controllers, switches, and other components all required replacement at various points.
For the Barnegat Light Osprey Cam, we chose to mount the camera directly on the nest platform using a custom aluminum bracket. The camera, infrared light, and microphone are all attached to this structure.
The camera is positioned approximately three feet from the nest, which corresponds to the camera’s minimum focus distance. This is an important consideration, as placing the camera too close may result in an out-of-focus image. PTZ cameras also generate some operational noise when moving, so sufficient separation from the nest is beneficial.
We also wanted the system to be located on land with access to reliable AC power and dedicated internet service.
We use CamStreamer to broadcast our live feed to YouTube. CamStreamer operates directly on supported network cameras and requires only the purchase of a software license after the trial period. No additional streaming hardware is necessary. The platform also supports Facebook, Vimeo, and several other streaming services.
Whenever possible, installing a camera where AC power and wired internet service are available is the most reliable and cost-effective option.
Solar-powered systems can easily exceed $10,000 when accounting for panels, batteries, charge controllers, and associated infrastructure. Hardwired systems typically cost substantially less, although installation costs vary depending on camera selection and site conditions.
Wireless internet connections can also become prohibitively expensive for continuous live streaming. One camera system we partnered on with a utility company incurred monthly 4G data costs of approximately $2,000. Due to those costs and limited activity, the camera was eventually taken offline.
For more information or guidance, contact senior wildlife biologist, Ben Wurst: ben.wurst@conservewildlifenj.org